DIY Chalkboard Baby Nursery Wall Art
A Welcome Sign for Your Baby's First Visitors
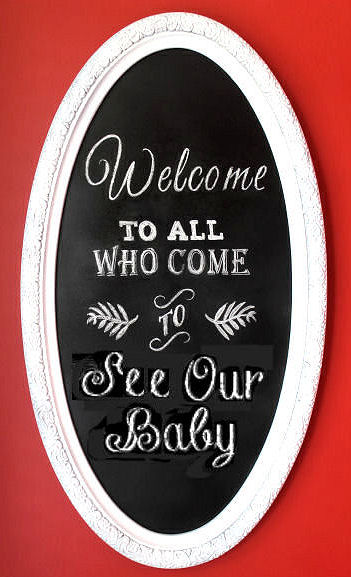
The DIY chalkboard baby nursery wall art that you see on this page was my very first foray into lettering or artwork created using chalk rather than oil or acrylic paints. It was a really cheap and easy crafts project with all of the excellent online tutorials and videos with instructions that walked me through it.
When the mom-to-be asked if I would figure the cost of creating her artwork into decorating the nursery I happily said, "YES"! I knew that I had an old, wooden frame for the chalkboard on hand and that chalk costs less than $1 a box. I needed something fun and creative to do and this welcome sign was a piece of cake to make and it looks SO elegant and expensive!
DIY Chalkboard Baby Nursery Wall Art
The wood frame I used to make the art was the perfect size for the spot on the baby's nursery wall.
 |
Mom wanted to hang the chalkboard welcome sign so that it would be the first thing that visitors to the room would see.
The space was just wide enough for the artwork and a mini-gallery of her framed maternity photos, sonogram pictures and a monogram that the baby's grandmother embroidered.
Preparing the Frame for the Chalkboard
- I took everything apart. I removed the old, brown paper backing, the hardware and the mirror.
- The frame got a good scrubbing with a toothbrush dipped in dish-washing detergent being careful not to "soak" the wood to prevent warping.
- I toweled it off and set it aside to air dry.
- After lightly sanding and cleaning the dust off the smooth sides; it was time to paint!
- After placing the frame on a layer of newspapers outside, it was painted using a can of white (to match the trim of the nursery) spray paint.
It would have been impossible to get the paint inside all the little nooks and crannies of the ornate design but that was alright; it gave it an aged, vintage look that matched the style of the DIY chalkboard baby nursery art.
How to Transform a Mirror Into a Chalkboard
I decided that I would use chalkboard spray paint to turn the mirror into a chalkboard but after reading online tutorials I discovered that flat black spray paint would work just as well and I just happened to have a can on hand! This stuff is CHEAP compared to real chalkboard paint and it worked great! Here's how I did it. I did not paint the shiny, reflective side of the mirror; I turned it over and painted the dull, gray side just in case at some point somebody wants to ditch the art and use the mirror again. Use good spray painting principles; several light coats are better than one heavy one. Let the paint dry between coats. Let it dry overnight if possible to be sure it's ready for lettering.Seasoning the Chalkboard
To be sure that you can use the sign over and over again, season the chalkboard. You will do this by holding a piece of chalk sideways and rubbing it lightly over the entire surface and then wiping it off with a soft cloth.Creating Chalkboard Nursery Art
I used white chalk and wrote a short message to welcome the baby's guests but if you like color or have a favorite Bible verse, a favorite baby quote or would like to display your baby's name on the nursery wall; go for it!Change the decor daily if you like; just wash the letters off and start over!
Preserving the Nursery Wall Art
Most new moms don't have time to spend on temporary decorations and would like to preserve their efforts. To "set" your artwork so that it won't smudge easily simply give it a few lights of hairspray. Once again, a few light coats is better than one heavy one.Thanks for visiting Unique Baby Gear Ideas and I hope that when you create your own DIY chalkboard baby nursery wall art that you will stop by and upload your pictures and share your ideas to help other expectant moms create art for their baby's room.
When you click on links to various merchants on this site and make a purchase, this can result in this site earning a commission. Affiliate programs and affiliations include, but are not limited to, the eBay Partner Network and Amazon Affiliate Program such as the ones to your left on this page and others. Please see our Affiliate Disclosure page for more information.
More UBGI: Rss Feed |
Unique Baby Gear Ideas advises everyone to never use drop side baby cribs. It is illegal to buy, sell or use a drop side crib. If you own a drop side crib, please disassemble it and dispose of it at the local city or county waste dump.

New! Comments
I would love to know what you think of our site! Leave me a comment in the box below.