Colorful and Bright Nursery
by Caitlin
(Victoria, BC, Canada)
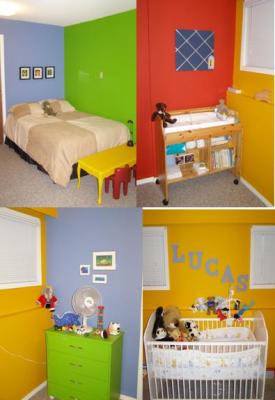
The first thing we did to decorate our baby's colorful and bright nursery was get the landlord's permission to paint the walls. As other apartment dwellers are aware painting is not always an option; it is simply not allowed. Fortunately, he didn't ask what color or else we probably would have been in trouble.
We painted each wall with a different color. It was a very big room so it also houses our extra bed which is nice for cuddling our son, and visiting family. We wanted colors that would keep the room sunny as we live in a basement suite, and that would be stimulating and match everything.
Everybody's first impression was shock. It is definitely an overwhelming paint scheme, but all of our son's toys fit in, even the tackiest, and he absolutely adores it. We tried to incorporate the four colors throughout the room.

Go Here to See More
Colorful and Bright Nursery Ideas
We were on a very tight budget and honestly spent under $200 fixing this room up for our little one's arrival. We didn't buy any fancy bedding, just used some basic Sesame Street sheets. We wanted everything to be functional and replaceable. Baby's are known, after all, for the messes they can create. All of the furniture was second hand and some items like the change table (was a desk) had to been reworked. Luckily, baby's dad is a carpenter and has an incredible imagination.
Our son loves his room, and it has become a great place for all of his little friends to get together and hang out in.
If you have any questions about how we decorated our baby boy's nursery, post them here on Unique Baby Gear Ideas and I will be happy to respond.
Comments for Colorful and Bright Nursery
|
||
|
||
|
||
|
||
I share nursery projects and repair ideas for inspiration, but I’m not an authorized crib technician or manufacturer representative. Always verify part compatibility and safety standards before making repairs or modifications. For details, please read the full disclaimer.
Hi, I’m Jan — the creator of Unique Baby Gear Ideas. I love helping expecting parents discover nursery décor inspiration and creative photo shoot ideas that make every stage of pregnancy feel beautiful.
Over the years, I’ve helped thousands of parents choose safe, stylish nursery furniture through hands-on reviews and real-world testing.
The suggestions I share here come from years of hands-on experience styling nurseries, reviewing maternity gowns, and learning what makes each photo session shine.
All articles and images on Unique Baby Gear Ideas are personally reviewed and edited by Jan Bay. Modern creative tools may assist with design or drafting, but every final page reflects my own voice, experience, and editorial judgment.
Unique Baby Gear Ideas advises everyone to never use drop side baby cribs. It is illegal to buy, sell or use a drop side crib. If you own a drop side crib, please disassemble it and dispose of it at the local city or county waste dump.
🌟 Get Featured!
Have a gorgeous nursery or DIY project you'd love to show off?
✨ Share Your Nursery →
UBGI Gold Standard 2025
Verified for performance, SEO,
and accessibility compliance.

